Last updated on March 22nd, 2026 at 07:26 am
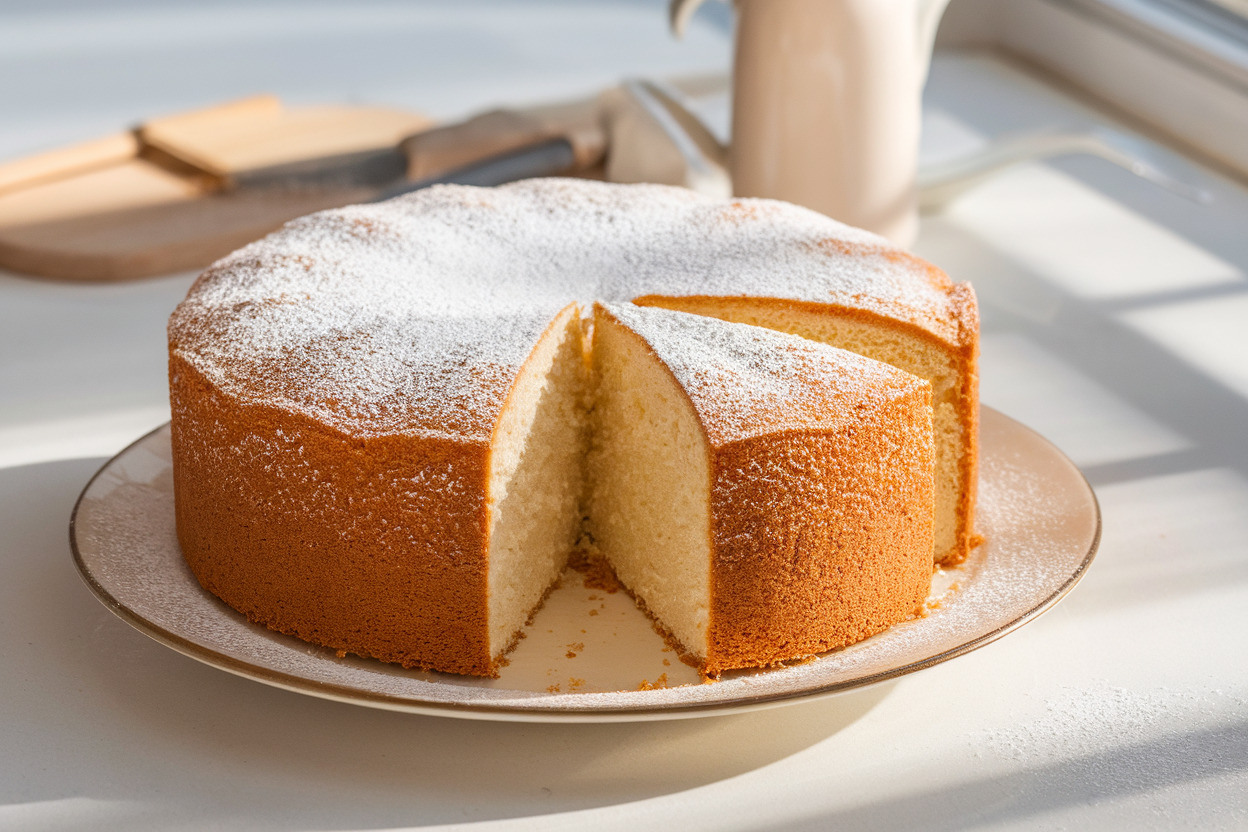
Most cakes rely on butter for richness, but this one leans on ricotta for moisture and structure without feeling heavy. That single swap changes everything about the texture. The result lands somewhere between a traditional cake and a delicate cheesecake, but without the fuss.
It slices clean, stays soft for days, and doesn’t demand layers of frosting to feel complete. I keep coming back to it because it feels impressive while being ridiculously straightforward.
Once you make it once, it quietly becomes part of your regular rotation.
Ingredients
Method
- Preheat oven to 350°F (175°C) and grease a 9-inch springform pan.
- In a large bowl, whisk ricotta until smooth. Add sugar and mix until combined.
- Add eggs one at a time, mixing well after each addition.
- Stir in melted butter, vanilla extract, and lemon zest.
- In a separate bowl, whisk together flour, baking powder, and salt.
- Fold dry ingredients into the wet mixture gently until just combined.
- Pour batter into prepared pan and smooth the top.
- Bake for 45 to 55 minutes until the center is set and a toothpick comes out with a few moist crumbs.
- Cool in the pan, then remove and let cool completely before slicing.
- Dust with powdered sugar before serving if desired.
What Makes This Recipe Shine

Ricotta does the heavy lifting here, and that’s exactly why this cake works so well. It adds moisture without turning the crumb dense, and it keeps everything tender in a way butter alone just can’t manage. You get richness without that weighed-down feeling after one slice.
The texture sits in that perfect middle ground between fluffy and creamy. It’s not airy like sponge cake, and it’s definitely not as thick as cheesecake. I like that balance because it feels indulgent but still light enough to go back for seconds without regret.
Flavor-wise, it stays simple and confident. Vanilla and lemon zest carry the whole thing, and they don’t need backup singers. I’ve tried adding extra extracts and random spices before, but honestly, the clean version always wins.
Another thing I love is how forgiving it is. Overmix slightly? It survives. Bake it a few minutes longer than planned? Still moist. For a cake that looks elegant on a plate, it’s surprisingly low-maintenance.
It also works for almost any occasion. I’ve served it at family dinners, brought it to casual get-togethers, and even made it on a random weekday just because I wanted something good with coffee. It never feels out of place.
Ingredients You’ll Need
- 2 cups whole milk ricotta – Full-fat gives the best texture and flavor. Drain it if it looks watery.
- 1 cup granulated sugar – Regular white sugar keeps the crumb clean and soft.
- 3 large eggs – Room temperature helps everything blend smoothly.
- 1/2 cup unsalted butter, melted – Adds structure and subtle richness.
- 1 1/2 cups all-purpose flour – Standard flour works perfectly here.
- 2 teaspoons baking powder – Gives lift without making it airy.
- 1/2 teaspoon salt – Balances sweetness and sharpens flavor.
- 1 tablespoon lemon zest – Fresh zest only; bottled won’t cut it.
- 2 teaspoons vanilla extract – Real vanilla makes a difference.
- Powdered sugar (optional) – For a simple finish on top.
Step-by-Step Instructions
1. Prepare the Pan and Preheat
Preheat your oven to 350°F (175°C) and grease a 9-inch springform pan. I like lining the bottom with parchment because it guarantees an easy release. Don’t skip this step unless you enjoy negotiating with stuck cake.
Set the pan aside while the oven fully heats. Starting with a properly hot oven ensures the baking powder activates right away. That initial lift matters more than people think.
2. Mix the Ricotta Base
In a large bowl, whisk the ricotta until smooth and creamy. Break up any lumps so the batter stays silky later. A few small bits won’t ruin it, but smoother is better.
Add the sugar and whisk again until combined. The mixture should look slightly glossy and thick. This stage builds the foundation of your cake’s texture.
3. Add Eggs and Flavor
Crack in the eggs one at a time, mixing well after each addition. This keeps the batter cohesive and prevents it from separating. You’ll notice it loosens slightly, and that’s exactly what you want.
Stir in the melted butter, vanilla extract, and lemon zest. The scent at this point is subtle but fresh. That lemon zest quietly elevates everything without screaming citrus.
4. Combine Dry Ingredients
In a separate bowl, whisk together the flour, baking powder, and salt. Mixing dry ingredients first distributes the leavening evenly. It’s a small step that makes a noticeable difference.
Gradually fold the dry mixture into the ricotta batter. Use a spatula and gentle motions to avoid overworking the flour. Stop mixing as soon as no dry streaks remain.
5. Bake to Perfection
Pour the batter into your prepared pan and smooth the top. Tap the pan lightly on the counter to release trapped air bubbles. That quick move helps create an even crumb.
Bake for 45–55 minutes, or until the center is set and a toothpick comes out mostly clean. A few moist crumbs are fine; wet batter is not. Let the cake cool completely before removing the springform ring.
Once cooled, dust the top with powdered sugar if you want a simple finish. I prefer keeping it minimal because the texture speaks for itself. Slice with a sharp knife for clean edges.
Common Mistakes to Avoid
Using watery ricotta is the fastest way to sabotage this cake. If your ricotta looks loose or has visible liquid, drain it in a sieve for at least 30 minutes. Too much moisture throws off the balance and can make the center gummy.
Overmixing the batter creates a tougher crumb. Flour develops gluten when you agitate it too much, and that’s great for bread but not ideal for cake. Fold gently and stop once combined.
Pulling the cake out too early causes a sunken center. The top should feel set and lightly golden before you remove it. If it jiggles heavily in the middle, give it more time.
Skipping the cooling phase makes slicing messy. The structure finishes settling as it cools, so patience pays off here. Cutting too soon leads to crumbly edges.
Another mistake is overpowering the flavor with too many add-ins. Chocolate chips, heavy glazes, and thick frostings can bury the delicate ricotta texture. Keep it simple and let the cake do its thing.
Alternatives & Substitutions
You can swap lemon zest for orange zest if you prefer a softer citrus note. I’ve done that when I wanted something a little sweeter and less sharp. It changes the mood without changing the structure.
Almond extract works beautifully in place of vanilla, but use it lightly. It’s strong and can dominate quickly. A half teaspoon usually does the trick.
For a gluten-free version, use a good 1:1 gluten-free flour blend. Make sure it contains xanthan gum for structure. The texture stays surprisingly close to the original.
If you want a slightly richer cake, replace half the butter with olive oil. It adds a subtle depth and keeps the crumb extra moist. I tried this on a whim once and ended up liking it more than expected.
You can also fold in fresh berries for a seasonal twist. Toss them lightly in flour before adding so they don’t sink. Blueberries and raspberries both work well.
FAQ
Can I use part-skim ricotta instead of whole milk?
Yes, but the texture will be slightly less rich. Whole milk ricotta creates a creamier crumb and fuller flavor. If part-skim is all you have, it still works fine.
Why did my cake crack on top?
Minor cracks usually mean the oven ran a bit hot. It doesn’t affect flavor at all. A light dusting of powdered sugar hides it easily.
How should I store this cake?
Keep it covered at room temperature for up to two days. After that, refrigerate it to maintain freshness. Let slices come to room temperature before serving for the best texture.
Can I freeze ricotta cake?
Yes, wrap slices tightly in plastic and freeze for up to two months. Thaw overnight in the fridge. The texture stays surprisingly good.
Do I need a springform pan?
A springform makes removal easier, but a regular cake pan works if lined well. Just allow extra cooling time before turning it out. Gentle handling prevents cracks.
Can I reduce the sugar?
You can cut it slightly, but don’t remove too much. Sugar affects moisture and structure, not just sweetness. Reducing by a couple of tablespoons is usually safe.
Final Thoughts
This cake proves that simple ingredients can create something quietly impressive. It doesn’t rely on heavy frosting or flashy decoration to win people over. The texture and flavor carry it confidently.
I make this whenever I want a dessert that feels homemade but polished. It’s relaxed, dependable, and honestly kind of hard to mess up. Once you bake it, you’ll see exactly why it earns a permanent spot in the recipe box.

Dr. Pallab Kishore, MS in Orthodontics and owner of Orthodontic Braces Care, shares expert tips on braces, aligners, and oral health from 10+ years of experience.